Saturday 20 May 2017

Live online class at MM10

Hi everyone!

Today I am going to tell you about the experience of a live online class that my class carried out the past 4th of May at MM10.
MM10 (or Moodle Mooc 10) is a series of online conferences about different topics regarding education that are taking place from 1st of May until 4th of June. The purpose of this, is to connect teachers around the world, in order to exchange knowledge and experiences including or not technology in the classroom.

The conference was called Open Educational Digital Projects for CLIL Primary Education. We have talked about the experience with ICT of each one of us in our ICT course from the Master's Degree in Bilingual Education, it includes our own learning diaries, our blogs.

To make this, we have followed these steps:
- Draft our speech.
- Design a support slide (for a common presentation).
- Participate in the Online Conference in MM10 (in which I could not intervene because of technical problems).
- Reflect on the experience in our learning diary.

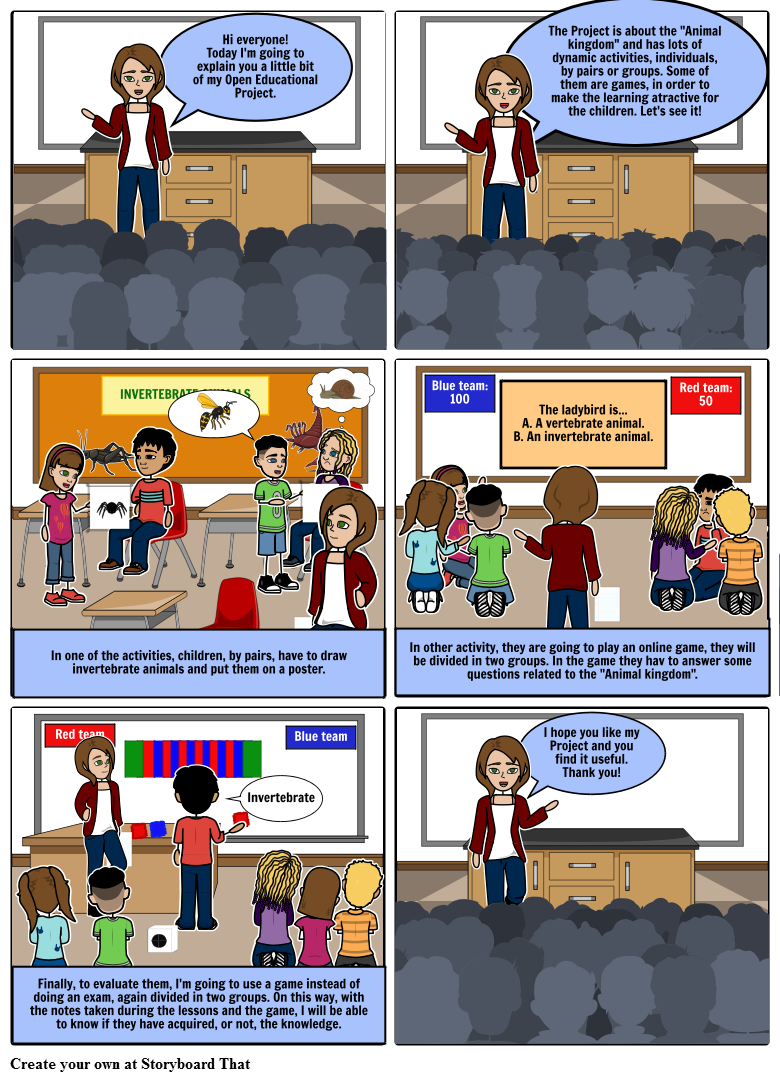
Here is my class presentation and my support slide:


Open educational digital projects for clil primary education from Jefe de Área de Formación en Red y Redes Sociales. INTEF


My support slide

After that, we have to prepare a speech for the conference of no more than five minutes, to present and talk about our Open Educational Digital Project. You can see my speech upload with Issuu here:


The 4th of May, we went to the conference page and present our collaborative live class here one by one. You can see the conference belong:


REFLECTION
Even if I cannot participate in the conference, I could see it and it was an incredible opportunity to learn, from my classmates and other teachers, new ways of education using ICT.
This makes me think about what kind of teacher I want to be in the future, because I really believe that motive our students and use a creative and innovative methodology in our classrooms are the key to be a good teacher.
Thanks to this online conference I have notices that share your knowledge and learn from other can make you open your eyes about somethings. It was very interesting to hear my classmates' presentations and see their ideas and the Projects they have created.

I would like to say also, that I have learnt a lot during this Masters' ICT course, new tools, techniques and different ways to teach a content (no more exercises, more super learning missions). ICT is a time consuming subject but it is also an important subject for us as a 21st century teachers.
If you incorporate ICT into your lessons, you know it, but if not and you are going to do it, you will see it. It is a hard work for the teacher, you have to be so many hours preparing the content and the challenges that your students will finish in five minutes, but you will see also that they like learn new things because it is not a bored activity, it is funny and it has a lot of advantages.
This is what I was feeling during these four months in the subject. We have so much work to do, but I have learnt a lot and I am going to use almost all of these resources in my future lessons.


If you have any doubt or you have tried it, leave a comment. I hope you like it.

Thursday 11 May 2017

Assessment rubric with Quick Rubric

Hi everyone!

Now is time to evaluate the work done by our children. To do that, we have to design an assessment rubric.
I am going to include some important elements to take into account when designing rubrics.

What means assess?
To assess means to evaluate students knowledge about the subject matter. It determines if the aims have been acquired or not. The following characteristics are the one that I am going to take into account:
Provides diagnostic feedback.
- Evaluate progress.
- Helps educators set standards.
- Motivates development.
- Allows self-evaluation.

What is assessment rubric?
It is a tool that indicates the marked aims or criteria. It can be used for class participation, acquired knowledge and so on, in any primary course.
I decided to create a rubric to evaluate my students. When creating a rubric it is important to consider the final result that the student are going to produce and also the progress that they make throughout the Project.

Rubric elements
To create a rubric we have to take into account some elements:
- Aspects of the learning process to be assessed.
- Criteria.
- Scale of ratings.
- Clear descriptors.

Creating a rubric
First you have to think what you want to evaluate with your rubric and start designing a prototype rubric. To make it, I have used Quick Rubric. This is an easy and brilliant tool to create rubrics on a faster way.
I have taken into account the following aims: content knowledge, class participation, progress during the Project, group work and self-evaluation (of each child, they have to complete it) and this is the final result.
Image retrieved from Quick Rubric

After assess them with the rubric, the teacher can ask them if they are agree or not, in order to make them self-assessment.
They can also write their opinions about the activities on a paper and give it to the teacher, this is so that the teacher can improve the activities, his/her assessment by the students.


Self-reflection and conclusion
Before this challenge, I knew that evaluation was important in the teaching-learning process. In addition, I created several rubrics for this, but I always used Word because I did not know about this tool. Now that I know Quick Rubric, I am going to continue using it since as I said earlier, it is easy to use and brilliant to create rubrics faster.
In addition, I recommend you to create a scheme before you start designing it, so you have everything well organised. This will be very useful when you start creating the rubric since it will only be copied with the tool.

In my opinion, I consider that the rubrics are crucial when evaluating a child all the work he/she has done during the lessons, although we do not always take enough time to design them. Therefore, I encourage you to spend more time creating a good rubric so that when you have to evaluate any child, it will be easier for you.

If you have any doubt or you have tried it, leave a comment. I hope you like this resource.

Thursday 4 May 2017

Super learning mission 2: Create a class blog!


Hi everyone!

Today I want to show you the second super learning mission that I have created. I am going to follow the previous post steps to explain this super learning mission. This mission, consist of create a class blog in which each child has to write a post, they have to make some draws to explain it (done by themselves) like the habitat, the skeleton of the animal, its food and so on.
This is in order to continue working with No me cuentes historias, ¡dibújamelas! because children have to draw it, not only explain.

- Learning mission instrucions:
  • First, children have to take into account the information they found for the comic.
  • Then, they have to write all the information on a post in the class blog following the next structure:
    1. Explain the animal's habitat.
    2. Talk about the groups to which the animal belongs (viviparous-oviparous, vertebrate-invertebrate, mammal-bird-reptile-fish-amphibian).
    3. Tell what the animal eats and if it is carnivore, herbivore or omnivore.
    4. Explain some extra strange or surprising information.
- Goals to be achieved:
  • Be creative.
  • Review acquire knowledge.
  • Learn how to make posts.
  • Express himself/herself on a correct way (written form).
- Digital tool:
- Competences involved:
  • Digital skills.
  • Social and civic skills.
  • Sense of initiative and entrepreneurship.
  • Cultural awareness and expression.

- Collaborative Project alliegned with:

- An example post:

- What have I learnt with this super learning mission?

Firstly, I want to say that I have learnt a lot making the previous posts. At the beginning of this year, I have never made a blog, so I didn't know how I could make posts, what I could write on the post, how I could add photos or videos and so on.

Nowadays, I know a few things, because I am not an expert, so in my experience this is a fun way to communicate to others what I am learning, so they can take advantage of this, learn it and use it in the way they like the most.
The most difficult part, as in the previous post, has been to think about the super learning mission, since as I said before, I am more accustomed to carry out the activities of the book or some invented, but not to create a super learning mission where children phave an active participation.
So again, I encourage you to try it with your students, because it is made with an easy tool, encourages group participation and is funny for the children and for the teacher to see their draws. This is other useful tool that I am going to use in my future clases.

If you have any doubt or you have tried it, leave a comment. I hope you like this second super learning mission and you like it.

Monday 1 May 2017

Super learning mission 1: Make a comic!

Hi everyone!

Today I am going to talk about how to turn an activity or exercise into a super learning mission. The teacher has to draft the learning mission instrutions, the goals to be achieved, the digital tool that the children are going to use and the competencies involved. The teacher can also alliegned it with the partner collaborative Project that she wants to contribute if she or he has it. Now I am going to show you my super learning mission, how the comic would be and what I have learnt.

- Learning mission instructions:

  • First, children have to choose an animal to make a comic.
  • Then, they have to look information about it (if it is vertebrate or invertebrate, what it eats, how it moves, if it is a mammal, fish, reptile, bird or amphibian, where it lives and how we can take care of its hábitat).
  • When the child has the information, he/she has to make a comic with the tool StoryboardThat. (I told you about this tool on a previous post).
  • Finally, each of them have to show and explain their comic to their classmates.
- Goals to be achieved:
  • Be creative.
  • Review animals movements, feedings and groups (viviparous/oviparous, vertebrate/invertebrate, mammal/bird/fish/reptile/amphibian).
  • Know how to look for information online.
  • Express himself/herself.
- Digital tool:
  • StoryboardThat.
- Competences involved:
  • Communication skills.
  • Digital skills.
  • Social and civic skills.
  • Sense of initiative and entrepreneurship.
  • Cultural awareness and expression.
- Collaborative Project alliegned with:
- Comic:

Made with Storyboard That

- What have I learnt with this super learning mission?
The first thing that I have learnt is that a super learning mission is funnier than an activity or exercise, because the child is involved in the learning process and he/she has to think and be creative to make it.
The most difficult part was turn an activity or exercise into a super learning mission, I think because I am accustomed to simple activities from the book or from another site. But doing this super learning mission, has made me see that, although it is difficult for the teacher to carry it out, create it or explain it, it is an easier way for the student to learn the contents and that they look for information outside the book to learn, to explore by themselves.
That is because I encourage you to try it with your students, because it is made with an easy tool, funny for the children and for the teacher to see their comics, so I am going to use it in my future clases.


If you have any doubt or you have tried it, leave a comment. I hope you like this super learning mission and you like it.

Tuesday 25 April 2017

Elevator Pitch with WeVideo

Hi everyone!

On this post I am going to continue talking about Collaborative Projects. If you do not know what I am talking about, you can go to my previous post to see it.
Today, I am going to choose a Collaborative Project to collaborate with. When I started to prototype my Educational Project I make it thinking only in use it with my class children and later, I discover the collaborative learning so I make some activities for the children to collaborate between them.
This is similar, but not the same, that is, now I am going to collaborate with other people's projects, sharing my own Project and adapting it to accomplish all the requirements.

The first thing that I made, was visit lots of Collaborative Projects to chose one. This is not as easy at it sounds, because there are several project that have something that I like. The Project that I like the most is "No me cuentes historias, ¡dibújamelas!". What they do, is explain the content by using draws or ask for the children to draw what they have learnt from the explanation, so they can see the content. I like this the most because we learn 80% of what we see, and it is important for me to motivate the students and make the lessons easier for them. Here you can see their Project:
http://dibujamelas.wixsite.com/dibujamelas

Once I know which project I am going to collaborate with I made an Elevator Pitch, this is a short video (20 seconds) in which you have to explain your Project in order to sell your product, find financial support or like me, explain how my Project could contribute to "No me cuentes historias,¡dibújamelas!" Project, by using WeVideo, you can see here the result:


This new tool is useful to create videos because you can upload or record a video or audio, ad text or transitions and finally, upload the result where you want, that is, dropbox, YouTube, Facebook and so on, or download it for you and your students. Before recording the video, I made a draft to know what to say in my elevator pitch:
- Hook: Do you know how difficult can be motivate our students?
- Problem: Nowadays, children have lots of distractions so, motivate them to study can be difficult for us.
- Solution: With my Poject, I am going to motivate and make them love Science, by using visual tools.
- Close: So I hope you accept me in your Project and I hope you like it. Thank you.
Finally, I recorded the video by using my Smartphone and as I said before, I modified it with WeVideo.

What have I learnt?
Thanks to this challenge, I know new amazing Open Educational Projects that I will take into account in my future clases. I recommend you to look for them because they are very interesting.
In addition, I am developing myself as an innovative teacher, something that seems crucial to me these days.
At the begining, I thought it would be a difficult challenge, but finally, and once I have my Project in mind and what I want to say, I set about it. What I found more difficult was the reording, because it made me nervous and could not explain me. Despite this, I managed to finish it and I think it is a tool that I will use in the future, since it is important to be able to explain and symmarize what you want to express, so I recommend you to try it and tell me.

If you have any doubt or you have tried it, leave a comment. I hope you find it useful and you like it.

Thursday 13 April 2017

Designing a visual metaphor for my Collaborative Educational Project.

Hi everyone!

Today I am going to show you an online visual metaphor of how I am going to turn my Open Educational Digital Project into a collaborative one. I have chosen collaboration within the classroom through cooperative learning, that is, the children have to collaborate between them to learn new things through an activity.
I have used a new tool called Pixton to make the visual metaphor, and here you have the final result.

This new tool is similar to StoryboardThat that I explain in the previous post, this one is a bit more complicated, but you have more freedom to move the characters and express their feelings, that is what I like the most.

What have I learnt with this resource?
I knew this tool from my degree and I like it so much because I can move the character and put it in the position that I want, that allows me to express better what I want to say with the character (how they feel, what are they doing and so on).
Something that I have learnt wihle doing this visual metaphor, is that there are different ways to make an Open Digital Educational Project into a collaborative one. For instance we have:
- Collaboration within the classroom through cooperative learning (I have chosen this one).
- Collaboration out of the classroom, connecting with other classes, other communities, with the real world.
- Collaboration back to the classroom, involving external agents in the learning process so as our classes become a real learning community.

I found this information in my URJC's Aula Virtual.


In my opinion, the easiests is the first one, but collaboration back to the classroom could be interesting to try, so maybe I use it on my lessons. I also think that, doing an Educational Project can be very beneficial, not only for our students, but also for ourselves, since socializing with other people and learning from their ideas is important today. We can learn a lot from other classmates, from other classes and even from other schools, so I encourage you to do Collaborative Educational Projects.

If you have any doubt or you have tried it, leave a comment. I hope you like this new tool and find it useful.

Thursday 6 April 2017

Prototyping my Open CLIL Educational Digital Project by using different tools.

Hi everyone!

Last day, I showed you a deep analysis of an Educational Project and today, I am going to show you my Project Prototype.

First, I want to explain how I have created my Project and later, I am going to tell you some descriptions about it.

1. Creating my prototype:

First of all, I have completed a template to have a first approach to the Projet (what is my Project about, the aims, the roles of the children and the teachers, the methodology and so on). I am going to upload it for you with a new tool called IssuuThis is an online tool that allows you to upload documents and create new ones by using different formats and it is easy to use. I have taken the template from my university URJC's Aula Virtual:

This could be difficult to do because you have to think, before doing it, about your Project and the final result that you want, and also, because I want to improve children's knowledge by using games, songs and other funny activities to motivate them. On my Project, as I said before, games and songs are going to have an important role, this is because it helps them to acquire the knowledge easier and to achieve the aims. I decided to focus my Project on the "Animal kingdom".

In addition, this Project is going to follow a cross-curricular line with other subjects. The Project is for Natural Science, but there are other subjects connected like Physical Education (where they can make some exercise related with the animals), Music (where they can hear some animals' songs) or Arts and Crafts (where they can create some posters related to animals).

When I finished, I started designing a short presentation to show you my Project. I have made it with StoryboardThat, in order to show you a new interesting tool. This is an online tool so useful to make stories or comics. I have chosen it because it is more atractive for children if you explain the content with this tool, or they can use it to make their own comics.

2. Creating my prototype:

To create my prototype I have followed the next structure:

- Title.
- Students level.
- Number of sessions.
- Areas.
- Teachers' and students' roles.
- Aims.
- 4Cs of CLIL.
- Key competences.
- Skills.
- Resources.
- Setting.
- Challenges.

Here you can find my final prototype. To make it, I have use again Issuu, but with the document modified.


The Project that I have made, is for a standard class of second grade without any problem, but if we have any child with special needs, we can adapt it. We have to take into account also, the necessities and personalities of our children, to modify the content and the activities for them. I have used also visual support to make it easier to understand and more atractive for the children. You can see here a short presentation made with StoryboardThat.

Made with Storyboard That

3. Self-reflection and conclusion

What I have learnt is how to use different online and free tools to make the activities and explanations more atractive and funny for the kids. We have lots of easy new tools that we do not use, maybe because we do not know them, but from now on, I am going to use them in my lessons.

I have realised that it is not easy to design a Project because we have to take into account different elements and when you do it with the children, they can make different things that you do not expect, so you have to be prepared for everything.

As I said at the beginning of this post, I like to motivate the children to learn new things, so I consider crucial to adapt the content that we have to teach by using these new tools that are so creative and interesting, in order to make the lessons more interesting and dynamic.


If you have any doubt or you have tried it, leave a comment. I hope you like it and you find these tools useful.

Wednesday 22 March 2017

Analysing an Educational Project with Genially.

Hi everyone!

Today I am going to show you a new tool called "Genially". I have use this tool to analyse an Educational Project and to give some tips to improve it.
You can use it to explain a lesson in class or the whole unit if you like. Here is the final result.

The project that I have analysed is from http://reaaicleintef.blogspot.com.es/. You can take a look if you want. I have also use an Essential Project Design Elements Checklist to improve the Educational Project. Here is the Checklist.

Image retrieved from URJC's Aula Virtual
Now, I am going to do a deeper analysis of this project, that is for 3rd grade children, commenting each point of the checklist to know the strengths and weaknesses and to improve them.
- Key knowledge, understanding and success skills: this Project is focused on knowing the Earth and the Solar System so the children learn new vocabulary about this topic (the name of the planets and some celestial bodies). It also develops more vocabulary taking advantage of the topic such as the seasons, the name of the moon phases and the layers of the Earth, and some verb like give out, orbit, take, have got, and so on.
There are some activities that develop their critical thinking and self management and some others that develop the collaboration between them. For instance, by pairs, they have to make a puzzle online.
- Challenging problem or question: the question that I could ask of this project is: What is the Solar System? The Project is guided by the answer of this question and it is developed through activities and songs. In addition, I can say that the level of the activities is adequate to children in third grade.
- Sustaned inquiry: the Project use an active methodology, where the children can ask questions, think by themselves, talk and discuss between them to make the activities, and so on. In my opinion, the project is well focused to make the children be active learners and to involve them in the teaching process.
- Authenticity: the Project is connected with the students' own concerns so they can give their own opinions, they can also explain their experiences and what they know about the topic. It uses real-world process and make a real impact in the children because they can learn how is the Solar System, how the day and night happen, how are the moon phases that they can see every night, and so on. - - Student voice and choice: in this Project there are some activities where the children can say their opinions but, from my point of view, it is necessary to make more of these activities because is very important to give them opportunities to express themselves, talk or let them choose what can they do or how can they do an activity. For example, when they have to play day and night with a flashlight and a ball, is better for them if they can choose how to make it. This can improve their autonomy.
- Reflection: this is the first unit of the Project, and there is an activity where they have to draw the Solar System in their notebooks so this can give them an opportunity to develop the learning they have acquire and their creativity. But, apart from this activity, there is no more activities where they can demonstrate what and how they have learnt. From my point of view and as I said before, this is crucial for them, so we can change some activities to give them that opportunity.
- Critique and revision: in this Project I cannot see any activity to give feedback to the children or by themselves. I consider it important to know the opinion of the children in order to improve the activities and the Project in general. So the teacher can ask them orally what they think about the Project or make a chart for them to answer.
- Public product: on the sixth session, the children have to make a performance, in the Project does not said anything about do it in front of other classes, but they can do it to show them how is a Solar System and how the planets move around the Sun. I think this is a good activity, because they can express themselves and show it to their classmates, but there is no more activities like this one as I said in the "Students voice and choice" point.

What have I learnt with this tool?
I have learnt a new way to explain the content of a lesson, or a unit that could be difficult form them. Genially is a great tool with lots of accesories to customize your own Educational Project or you lessons. You can also add different links to make digital activities or to show videos so I think this is so useful for us if we want to make our classes more dynamic and interesting.

Here is the end of my analysis, if you have any doubt or you have tried it, leave a comment. I hope you find it useful and you like it.

Tuesday 21 February 2017

How to make a video presentation. Kizoa

Hi everyone!

I have made a video presentation about my partner Raúl Oviedo to show you a different way to present yourselves to the children.
This is only an example, but you can make it easy for them to know your name and something about the subject.
To make the video, I have used an application called Kizoa, so easy to use, and Audio joiner that is another application to modify the audios. Finally, I have upload it to YouTube. You can see here the result.

I have interviewed to my peer Raul, a 24 years old P.E. teacher. He is from Fuenlabrada and he is, actually, studying a Master's degree in bilingual education.


Those are the steps that I have followed to do it:
Step 1: Choose someone to interview or make your own presentation.
Step 2: Think if you are going to make it by audios and photos, like us, or if you prefer to make a video.
Step 3: Interview that person, you can make a short presentation before the questions. Write your questions and answers on a paper before recording your voice, in order to make it easy. You can also make more questions if you want, it depends on what the person is telling you.
- Questions:
  • What do you usually do in your free time?
  • What would yo like to be if you weren't a teacher and why?
  • What are your future plans on your educational career?
  • What are your expectations on this ICT course?
Step 4: Record the interview (audio or video file). You can use your mobile device for that or a computer.
Step 5: Take a picture of you or the person you are going to interview if you are going to make an audio presentation.
Step 6: Publish the recording on an online service (I have published it on YouTube).

What have I learned with this resource?
I have never made something like interview a partner, so, before make it, I was thinking about what can I ask him and what questions would he like to answer?
We have fun doing the activity and we laughed a lot with each mistake when we were recording the audios. But finally, I like the results and definitely, I plan to use this resource in my future clases.

You can also see my partner's work on his blog:
http://thesciencecorner93.blogspot.com.es/2017/02/2-minutes-with-zahara-maria-serrano.html

If you have any doubt or you have tried it, leave a comment. I hope you like this resource.

Who am I?

Hi everyone!


I am Zahara María Serrano, I live in a little village at the southeast of Madrid. I am an English Primary teacher and actually, I am studying a Master's degree in bilingual education at URJC here in Madrid.
I have created this blog to show you some resources that you can use at the science subject, in order to make the lessons understandable and more dynamic for the children.

I hope it will be useful and you like it.